MP3 Arduino
This tutorial demonstrates a practical application developed with an Arduino and an MP3 Shield . With these two basic electronic components you will be able to load your mp3 files and use it for any possible project – an interactive installation, as a locative media player, or a simple playback device.
To get started, after you have these two basic components in your hands (Arduino board and MP3 Shield), you need to download the Arduino Software for free. Follow the installation instructions in the Arduino page, connect the board on the computer, and make sure that you select from its menu the board type you own, as well as set the correct Serial Port (the physical port that your board is connected in your computer). After you make sure that everything is correctly configured, try to upload a sketch to the board (lots of examples available from the main Arduino Menu / File / Examples).
In order to develop a code example for the MP3 Shield you have to download the following libraries (installation instructions included in the following links):
Make sure that the versions you download are the latest, and that you install them properly according to the instructions. Also, you need to have a FAT32 formatted MiniSD card with mp3 files in it. In this example I used files with names like track001.mp3, track002.mp3, with bitrate of 192kbps.
The following code is a simple example that initializes the library and plays the first track that it is stored in the MiniSD card.
//Include libraries in the sketch
#include <SPI.h>
#include <SdFat.h>
#include <SdFatUtil.h>
#include <SFEMP3Shield.h>
SdFat sd;
SFEMP3Shield MP3player;

void setup(){
  //Uncomment following line to include a Serial, in this example mainly for debugging
  //Serial.begin(9600);

  //Setup MP3 shield, and play the first track
  if(!sd.begin(SD_SEL, SPI_HALF_SPEED)) sd.initErrorHalt();
  if(!sd.chdir("/")) sd.errorHalt("sd.chdir");
  MP3player.begin();
  MP3player.setBitRate(192);
  MP3player.setVolume(10,10);
  MP3player.playTrack(1);
}
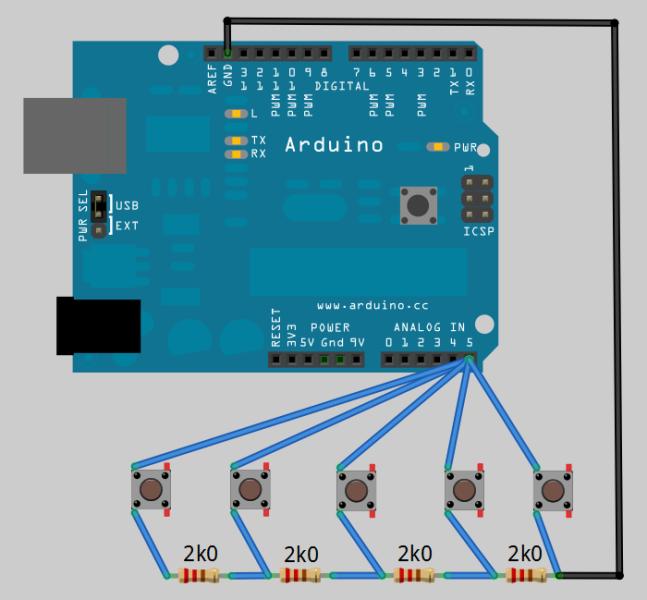
There are many ways to interact with the board and control the playback of the audio tracks. One way is to use buttons to play, stop, or skip the tracks, however in this example there are four different buttons that each one selects a specific track file. In order to achieve this, four buttons are implemented; for more info on this process have a look here, and here. This is a very popular method of using more input components (such as push buttons as in this case), using less analog inputs. The resistance difference that it is created, allows us to have a different value range for each button, therefore being able to distinguish each one to control different aspects of our system – control mp3 selection.
Following is the schematic configuration for the buttons, resistors, and board:
A final thing that has been included in this example is to create a loop for each track. The library does not include a built-in function that does this automatically. To achieve this, different variables are created to save the current state that has been selected. If the program does not receive any new selection, it will not trigger any more actions. If the currently selected track stops, the same selection variable is sent to the shield to start the same track again (therefore loop!). Here, is the complete code example:
//Include libraries in the sketch
#include <SPI.h>
#include <SdFat.h>
#include <SdFatUtil.h>
#include <SFEMP3Shield.h>
SdFat sd;
SFEMP3Shield MP3player;

//Set variables for buttons
int buttonIn=0;
int analogInPin = 0;

int prv_selection1 = 0;
int prv_selection2 = 0;
int prv_selection3 = 0;
int prv_selection4 = 0;

int state1 = 0;
int state2 = 0;
int state3 = 0;
int state4 = 0;

int newState1 = 0;
int newState2 = 0;
int newState3 = 0;
int newState4 = 0;

int value1 = 0;
int value2 = 0;
int value3 = 0;
int value4 = 0;

int oldValue1 = 0;
int oldValue2 = 0;
int oldValue3 = 0;
int oldValue4 = 0;
int state = 0;

void setup(){
  //Uncomment following line to include a Serial, in this example mainly for debugging
  //Serial.begin(9600);

  //Setup MP3 shield
  if(!sd.begin(SD_SEL, SPI_HALF_SPEED)) sd.initErrorHalt();
  if(!sd.chdir("/")) sd.errorHalt("sd.chdir");
  MP3player.begin();
  MP3player.setBitRate(192);
  MP3player.setVolume(10,10);
}

void loop(){
  //Get the analog value with analogRead(0) - first analog input from Arduino
  //Set 4 variables that corresponds to 4 different buttons
  value1 = analogRead(0);
  value2 = analogRead(0);
  value3 = analogRead(0);
  value4 = analogRead(0);

  //Use this function to get 4 different values from one single input
  //Assign it to buttonIn variable
  buttonIn = readButtons(0);

  //Create a toggle switch for each button - press button and don't release value
  if ((value1 > 450 && value1 < 520) && (oldValue1 == 0)){
    state1 = 1-state1;
    delay(10);
  }
  if ((value2 > 750 && value2 < 860) && (oldValue2 == 0)){
    state1 = 0;
    state2 = 1-state2;
    delay(10);
  }
  if ((value3 > 880 && value3 < 920) && (oldValue3 == 0)){
    state1 = 0;
    state2 = 0;
    state3 = 1-state3;
    state4 = 0;
    delay(10);
  }
  if ((value4 > 930 && value4 < 1000) && (oldValue4 == 0)){
    state1 = 0;
    state2 = 0;
    state3 = 0;
    state4 = 1-state4;
    delay(10);
  }
  //Check if the value is on, set newState for each button
  //and set 0 the rest button states
  if (state1 == 1){
    newState1 = 1;
    newState2 = 0;
    newState3 = 0;
    newState4 = 0;
  }
  if (state2 == 1){
    newState1 = 0;
    newState2 = 2;
    newState3 = 0;
    newState4 = 0;
  }
  if (state3 == 1){
    newState1 = 0;
    newState2 = 0;
    newState3 = 3;
    newState4 = 0;
  }
  if (state4 == 1){
    newState1 = 0;
    newState2 = 0;
    newState3 = 0;
    newState4 = 4;
  }

  //Reset current values to old, and wait for something new to happen
  oldValue1 = value1;
  oldValue2 = value2;
  oldValue3 = value3;
  oldValue4 = value4;

  //if each state is set to 1 (on), play track or stop it!
  //This also varifies that selected track keeps playing (loop mode)
  if ((newState1 == 0) && (prv_selection1 != 0)) {
    MP3player.stopTrack();
    prv_selection1 = newState1;
  }
  else if (newState1 != prv_selection1) {
    MP3player.playTrack(newState1);
    prv_selection1 = newState1;
  }

  if ((newState2 == 0) && (prv_selection2 != 0)) {
    MP3player.stopTrack();
    prv_selection2 = newState2;
  }
  else if (newState2 != prv_selection2) {
    MP3player.playTrack(newState2);
    prv_selection2 = newState2;
  }
  if ((newState3 == 0) && (prv_selection3 != 0)) {
    MP3player.stopTrack();
    prv_selection3 = newState3;
  }
  else if (newState3 != prv_selection3) {
    MP3player.playTrack(newState3);
    prv_selection3 = newState3;
  }

  if ((newState4 == 0) && (prv_selection4 != 0)) {
    MP3player.stopTrack();
    prv_selection4 = newState4;
  }
  else if (newState4 != prv_selection4) {
    MP3player.playTrack(newState4);
    prv_selection4 = newState4;
  }
}

int readButtons(int pin){
  // returns the button number pressed, or zero for none pressed
  // int pin is the analog pin number to read
  int b,c = 0;
  c=analogRead(pin); // get the analog value
  if (c>1000 || c<100) {
    b=0; // buttons have not been pressed
  }
  else if (c>450 && c<520){
    b=1; // button 1 pressed
  }
  else if (c>750 && c<860){
    b=2; // button 2 pressed
  }
  else if (c>880 && c<920){
    b=3; // button 3 pressed
  }
  else if (c>930 && c<1000){
    b=4; // button 4 pressed
  }
  return b;
}
And here is the final configuration of the real setup: